
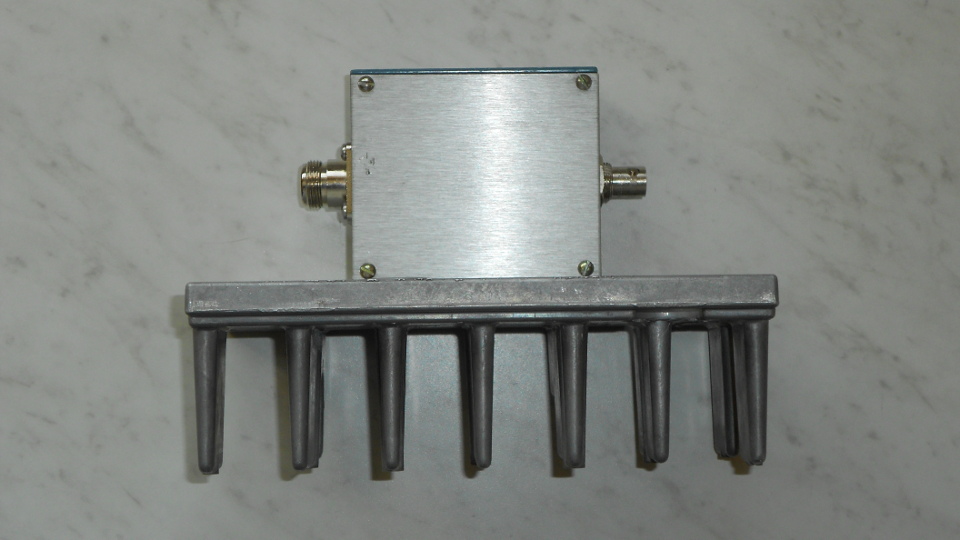
The completed attenuator and heat sink assembly
Edit: After writing this I devised a safe method to run the FT-2000 at 10 watts when on VHF/UHF. The entire band switching system is software-centric, controlled by DXLab Commander. Since the Yaesu CAT command set includes a method for setting power, I programmed each VHF/UHF band button to set the transceiver to 10 watts output. This is safe since there is no way to “bypass” software control in band switching where VHF/UHF is involved. The only possible glitch is in forgetting to reset power when going to HF, but this simply results in low power operation with no risk of equipment damage. In order to facilitate easy power resetting when going to HF I created an additional “HF” band button in Commander which disables the VHF/UHF system and resets power to 100 watts.
I needed an attenuator for driving VHF/UHF transverters. The goal was to take 100 watts of drive at 26 to 30 MHz down to +10 dBm (10 milliwatts) using whatever junk I could find. My 2 meter transverter uses a 26 MHz IF for 144 MHz, while my other transverters (222, 432, 1296 MHz) use a 28 MHz IF.
First, a few words about why. My Yaesu FT-2000 transceiver does have a low level transverter output. The level is -10 dBm, 20 dB below what I need. It could easily be amplified to reach the correct level, so why would I choose not to use it? The answer is both simple and complicated. I have just the one transceiver which I use from 1.8 to 144 MHz and hope to use for higher bands soon. Band switching all the stuff that needs to change going from HF to VHF or UHF with a transverter gets complex enough that I tend to forget things. I wanted to automate all the band switching tasks (RF routing to correct path, be it an HF amplifier or VHF transverter, enabling the correct amplifier while disabling all others, etc. I can easily do this using DXLab, which is my preferred multi function DXing software suite. DXlab understands transverters, so I can set it up to recognize what band I am on, be it 144, 222, 432 or even 1296 MHz, though the transceiver would be on 28 MHz for all of these. This would greatly simplify logging since the correct frequency would always be auto-filled in the logging software. The one stipulation in order to do all this is that band switching must be done through DXLab Commander in order for it to understand what band I am currently on when using transverters. If I set the band from the radio, Commander has no way of knowing that 28 MHz doesn’t mean I am operating on 10 meters!
Here’s the catch. On the FT-2000, the only way to activate the low level transverter output port is to switch to a special band called ‘AU’. This band is 28 MHz, but behavior is different from 10 meters in that on AU band the PA is disabled and the transverter output enabled. There is no way to do that when the radio is set to the normal 10 meter band or when sending a band/frequency request via CAT command. There is no CAT command for this AU band! It must be selected from the front of the radio, and not by a particularly intuitive process like all the other bands. If I used the transverter output, all my automation for band switching ideas would be out the window. Furthermore there would be confusion as to what band I was operating and I would have to manually edit frequency for each logged QSO. Forget it. That’s not going to happen! Hence my desire to use the high level output on the transceiver. I didn’t want to have to remember to turn down the drive, say to 5 or 10 watts each time I went to VHF or UHF, because I would tend to forget that eventually and the results might be costly. So, I wanted a transverter drive attenuator that would take 100 watts down to 10 milliwatts. That is 40 dB of attenuation.
Before deciding on the attenuator approach, I considered applying a fixed negative voltage to the FT-2000 ALC input to reduce its output to a very low level. I asked about this in two forums frequented by VHFers and was warned that there can be pitfalls. Some radios put out an initial spike of full power even with fixed voltage on the ALC line, which would not be good. Even if that were not the case for my FT-2000, failure of the ALC bias circuit would surely result in ugly consequences. I decided to forget about it and go with the high power attenuator. As always, I am grateful for the advice and elmering I received!

Schematic diagram and parts list for the attenuator
I had some 250 watt, 50 ohm RF load resistors on hand. One of those would make a fine input resistor for a pi network attenuator. I had some 51 ohm, one watt metal film resistors. One of those would do fine for the output. But for 40 dB attenuation, the series resistor in the pi network would have to be 2500 ohms at around 2 watts. I didn’t have something like that and trying to make one out of a series-parallel combination of resistors might add considerable stray capacitance. Ordinarily that might not matter too much at 28 MHz, but when making a 40 dB attenuator, stray capacitance could tend to “bypass” the resistor and cause the attenuation to be too low. However, there is another trick that can be used. The series resistive element can be replaced by a capacitor having reactance equal to the required resistor value at the frequency of interest. That works out to about 2.3 pF in this case. That is not much, but I had some Johanson 5200 0.8 to 10 pF muti turn air trimmers around. If I could keep circuit strays low enough or shield input from output that should work. Using a variable element would allow me to “dial in” the proper amount of attenuation, compensating for circuit strays (as long as they weren’t too great). There is a caveat when using a capacitor for the series element in a pi network attenuator. Attenuation will not be constant over a wide frequency range, because the reactance of the capacitor is frequency dependent. That wasn’t a problem for my intended use, since only a narrow frequency range is involved.
I needed a heat sink that could handle 100 watts intermittent duty. I immediately remembered I had some old repeater parts that might do the trick. Some folks might shoot me for this, but I grabbed a NOS Motorala MICOR UHF base station antenna network. This is a circulator, relay, filter and some other bits on a nice heat sink! I stripped all the rubbish off and there was my heat sink, ready to go. It’s a bit of an irregular shaped thing and has some extraneous holes here and there, but who cares? I was going to hide it behind a rack of equipment anyway. The antenna network also provided a type N female bulkhead connector with a short length of RG-400 coax already connected t it, as well as a BNC female bulkhead connector with a similar RG-400 lead. Wahoo! There were my input and output connections for the attenuator. I clipped them off before tossing the rest of the antenna network in my electronic refuse bin. RG-400 is nice stuff: Teflon dielectric, double silver plated braid, stranded silver plated center conductor. You can’t melt this stuff with soldering heat! All the better. A little more digging turned up a small cast aluminum box which I could use to house the attenuator components.
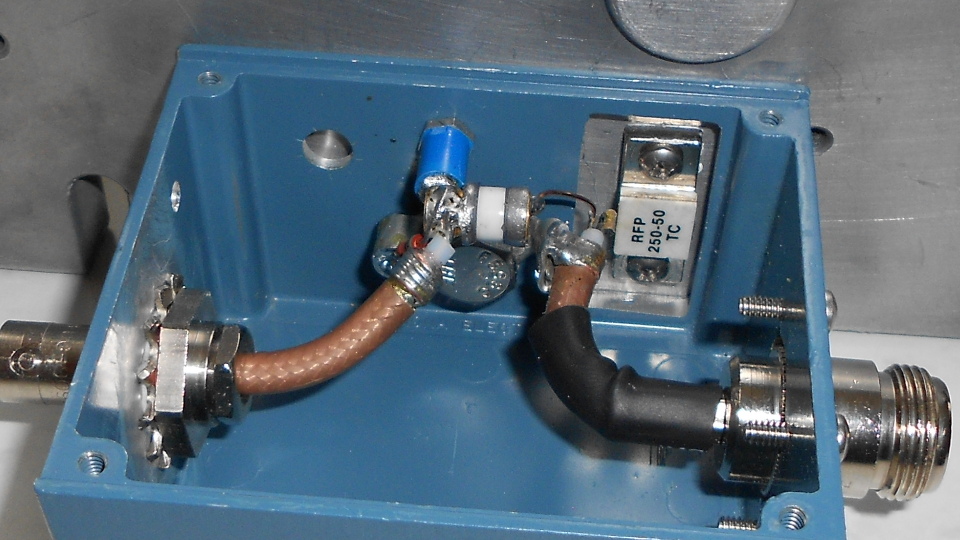
Inside view of attenuator with cover removed
I exercised some care in circuit layout and lead dress. I also left the shield on input and output coax as close to the end as possible in the hope that this might eliminate any need for a shield between input and output. After putting the circuit together I checked it on a spectrum analyzer / tracking generator. To my delight I found that using the trimmer I could vary the attenuation from 27 to 51 dB at 28 MHz. Wow! My circuit layout and construction was good enough. Flatness of attenuation over the 26 to 30 MHz range was within 1.5 dB. That is fine. In practice it will only be used over a 200-300 kHz range with any given transverter, and each transverter has its own built in adjustable input attenuator to fine tune its drive level. Attenuation slope over a 300 kHz range is too little for me to measure but probably about 0.1 dB. Return loss (input SWR) is better than my ability to measure, which is limited to about 30 dB RL (1.07 SWR). Plenty good enough.
One final note. I stripped the paint off the surface of the box that mates with the heat sink and from around the hole where the BNC connector is. Was this necessary? I don’t know but my standard operating procedure for RF circuits is to remove paint between mating surfaces in the enclosure or where connectors attach. I find it easier to do this in the first place than to disassemble something and strip paint after finding there was a problem!
Pingback: Automating HF/VHF/UHF Band Switching – Part 1 | N1BUG Adventures in Radio